Overview
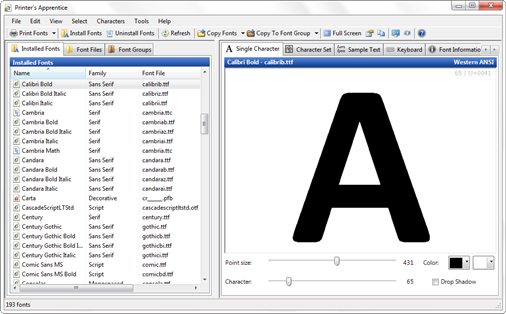
Viewing fonts with Printer's Apprentice is very easy. By default, Printer's Apprentice starts with the
Installed Fonts tab selected. These are the fonts installed on your computer.
Click on a font from the list
on the left side the the screen and the sample appears on the right side of the screen.
The Font Viewing tabs on the right let you select different ways to
look at your fonts. You can view one character at a time or multiple
characters. You can see a the font laid out in a paragraph or in a
keyboard configuration. You can even read the text data embedded in a font. Each of the Font Viewing tabs
has different controls to help you view your fonts. The Reference section has more information about
the Font Viewing tabs.
You can also view fonts from your hard drive or other media using the
Font Files tab.
Viewing Installed Fonts
The Installed Fonts tab lists the fonts that are currently installed
on your Windows system (Start > Control Panel > Fonts).
Clicking an installed font displays a font sample in the font viewing area.
You can also select one or more fonts by holding down the CTRL or SHIFT keys
while clicking fonts with the mouse . See Selecting Fonts
for more information about Printer's Apprentice functions that operate
The list has columns for the font name, the font file name,
and the size. The column headers can be clicked to change the sort order.
Each font has an icon that indicates the font format. The
icons are
described below.
To refresh the list, press F5 or select Refresh Font List from the
Tools menu.
Viewing Uninstalled Fonts
Use the Font Files tab to browse your hard drive and other storage devices
for fonts that are not currently installed on your system. You can view
uninstalled TrueType, OpenType and Type 1 fonts.
The Font Files tab has a folder tree at the top. The folder tree works just
like Windows Explorer. When you select a folder
containing font files, the actual font names are displayed in the list
in the lower half of the tab. If a folder has many font files, Printer's
Apprentice displays a progress indicator.
Like the Installed Font list, the Font Files list has has columns for the
font name, the font file name and the size. The column headers can be
clicked to change the sort order. Each font has an icon that indicates the font format. The
icons are
described below.
To refresh the list, press F5 or select Refresh Font List from the Tools
menu.
The Font Files tab also has a Read sub folders checkbox below the folder tree. When this is checked, Printer's Apprentice
will read the fonts in the current folder and all sub folders. Please note: reading all the fonts can be time consuming if you have
a lot of files in a given folder structure.
Font Format Icons
An icon to the left of the font name is used to indicate the font file format.
 | TrueType format (.ttf) |
 | TrueType collection (.ttc) |
 | OpenType format (.ttf or .otf) |
 | Adobe Type 1 format (.pfm & .pfb) |
 | Unknown format |
 | In the Font Files tab, indicates that font is installed
in Windows |
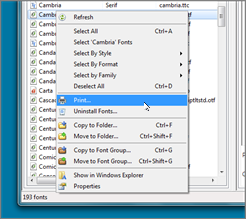
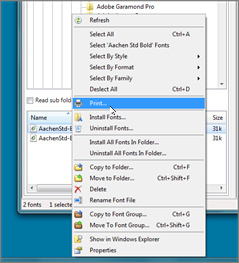
Context (right-click) Menus
Right clicking a font in either tab displays a context menu.
The menu displayed depends on the which tab is currently selected Installed Fonts or Font Files.
 |
 |
| Context menu for installed fonts |
Context menu for uninstalled fonts |
The entries on the context menus perform the following functions.
Refresh - Refreshes the current list.
Select All - Refreshes the current list.
Select 'Font name' Fonts - Selects all the fonts in the same family.
Select By Style - Selects all fonts with a given style (italic, bold, etc.)
Select By Format - Selects all fonts of a given format (TrueType, Type 1, etc.)
Deselect All - Deselects all fonts.
Print - Prints the currently selected fonts.
Install Fonts - Installs the currently selected fonts. Applies only to Font Files tab.
Uninstall Fonts - Uninstalls the currently selected fonts.
Copy to Folder - Copies the selected fonts to a folder.
Move to Folder - Moves the selected fonts to a folder.
Copy to Font Group - Copies the selected fonts to a Gont Group.
Move to Font Group - Moves the selected fonts to a Gont Group.
Delete - Deletes the currently selected fonts. Applies only to Font Files tab.
Rename - Renames a font file. Applies only to Font Files tab.
Show in Windows Explorer - Opens Windows Explorer to the location of the selected font file.
Properties - Displays the Windows Properties dialog box for the currently selected fonts.