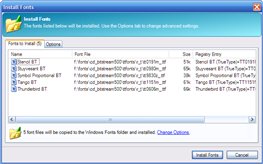
The Install Fonts dialog makes a font file available for use with other Windows applications.
Behind the Scenes
When a font is installed, the following steps take place behind the scenes.
- If specified, the font file is copied to a target folder. This is usually %windir%\fonts.
- The font is made available to Windows and other applications by executing the AddFontResource() API call.
- An entry is added to the HKEY_LOCAL_MACHINE\SOFTWARE\Microsoft\Windows NT\CurrentVersion\Fonts section in the Registry.
This makes the font available the next time Windows is rebooted.
- Other applications are notified of the font change by using a SendMessage(hwnd, WM_FONTCHANGE) call.
Font Destinations
The Install Fonts dialog has options that allow you select a destination folder before the fonts are installed. You might
use this if you prefer to house fonts on a separate drive from the Windows OS.
When installing fonts from a font group, the destination options are not available. Fonts from a group are always copied to the
%windir%\fonts folder.
Fonts to Install tab
This tab lists the fonts that will be installed. The list includes the source font file, the file size and the Registry
entry that will be created. The Registry Entry column will change depending on the destination folder for the font.
The bottom of the tab displays a summary of the font install actions to be taken, depending on the Options selected.

Options tab - Copy font files to Windows Fonts folder
When this option is selected, the font file will be copied to the %windir%\fonts folder before it is installed. This
is the recommended option to use.
Options tab - Copy font files to a different folder
When this option is selected, the font file will be copied to another folder before it is installed. The Registry Entry
used will change to "My Font Name (TrueType) = c:\targetfolder\myfont.ttf."
Options tab - Leave fonts where they are
When this option is selected, the font file will not before it is installed. The Registry Entry
used will change to "My Font Name (TrueType) = c:\sourcefolder\myfont.ttf."
Options tab - Create log file
Use this to create a log file detailing the results of the font install operation. This is helpful for
debugging any problems that may arise.
Options tab - Show log file when finished
When checked, the log file will open in Notepad when the font install process is complete.